Server provisioning with Ansible

The proliferation of cloud computing solutions has led to a significant uptick in the number of servers that need to be configured and managed within organizations. Not so long ago administrators had to deal with racks of physical servers that could be accessed in the local data center, but nowadays we have to manage thousands of servers that could be spread all around the globe. Here comes Ansible - one of the most popular provisioning software. In this paper I will present how to write our first playbook and use it to configure a sample host for deploying a simple Python-Django application.
1. What is Ansible?
Ansible is an open-source IT automation engine which can remove drudgery from your daily work, and will also dramatically improve the scalability, consistency, and reliability of your IT environment. Ansible is a software that allows you to write unified configuration files that can set up a server, a container, or even a specific application on demand.
With Ansible it is possible to automate three types of tasks:
- Provisioning: Set up the various servers you need in your infrastructure.
- Configuration management: Change the configuration of an application, OS, or a device; start and stop services; install or update applications; implement a security policy; or perform a wide variety of other configuration tasks.
- Application deployment: Make DevOps easier by automating the deployment of internally developed applications to your production systems.
Ansible can automate IT environments whether they are hosted on traditional bare metal servers, virtualization platforms, or in the cloud. It can also automate the configuration of a wide range of systems and devices such as databases, storage devices, networks, firewalls, and many others.
A huge advantage is that you do not even need to know the commands used to accomplish a particular task. You just need to specify what state you want the system to be in and Ansible will take care of it.
1.1 Why Ansible?
Apart from Ansible, there are at least three other provisioning solutions. Ansible has been chosen by my Team for two reasons: first, it does not require to have any additional software on client hosts, only Python – which we already had. Secondly, we have considered Ansible to have the shallowest learning curve among other similar solutions like Puppet or Chef.
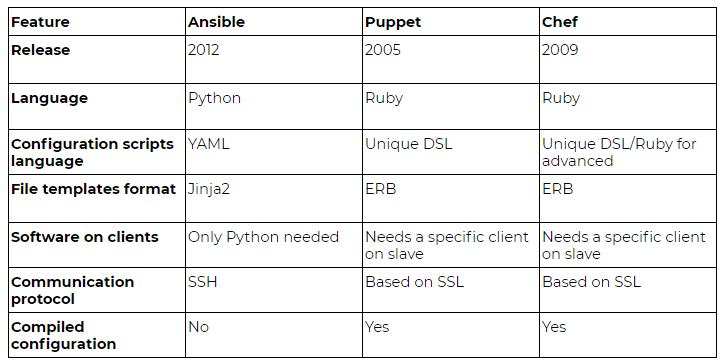
After a few months of using Ansible, the only disadvantages we have discovered are performance slowdowns on simultaneous configurations of dozens of hosts (but this has a negligible impact on our environment) and a lack of consistency check before the configuration. The last one might cause problems one day, for example Puppet first compiles the configuration, therefore it warns if there are conflicting requested packages (Python 3.4 and 3.5). Ansible will just proceed and we will end up with the last requested one during play (“a play” is called the execution of playbook(s) for a given host).
“Keep it simple, stupid” (KISS) is the underlying principle of Ansible, a configuration management and orchestration tool. In that sense, here is a simple introduction.
2. Deploying Django applications
This paper will describe how to use Ansible to deploy an application written in Python with Django framework and PostgreSQL. What are the basic steps to deploy the Django application?
- Get a server with a chosen system. For this example choose a host with a Centos 7.3 operating system.
- Create a user, for example “django”, who will host the application.
- Fetch the Git repository with our application to the server.
- We need to install and configure
python-virtualenv(preferably using requirements.txt). - Install and launch PostgreSQL database.
- Install and configure Gunicorn service.
2.1. Creating a “django” user
Performing a configuration using Ansible is all about Yaml playbooks.
---
- hosts: all
  vars:
    app_user: "django"

  tasks:
    - name: Creating a user {{ app_user }}
        user:
        name: "{{ app_user }}"
        home: "/home/{{ app_user }}"
    register: app_user_creation
First, we have to specify which servers this playbook should be run against, then we list the tasks. In this case we are allowing any host to be the target. Here we can specify the DNS name of the host(s), the IP, or a reference to a script that can dynamically generate a list of hosts. If we keep assigning playbooks to only strictly defined hosts (instead just “all”), it will prevent us from an accidental triggering configuration of the playbook against the restricted host.
Next comes the “vars” section that specifies variables used throughout the entire script. Now if we want to change the username, we can do it in one place, instead of searching through all tasks. It is also worth to mention the variables precedence: the most important variables come from calling the script from command line, next comes the ones from the main playbook, then separate vars files, other playbooks (a playbook can call another playbook inside), and lastly - default values.
Finally appears the “tasks” section – a list of tasks, one by one to be performed on a given host(s). In the abovementioned simple playbook, there is only one task: creating a new user with a name and home directory. Ansible comes with a very well written documentation, which is available online or by using the ansible-doc command tool, for example “ansible-doc user”. Each task can be “registered”, which means that we can refer to it later.
Now we can call this play using a command:
$ ansible-playbook -i "10.157.53.18, " --private-key ~/.ssh/magic_key -u root django_app.yml
2.2. Fetch Git repository with sources of our application
It is the time to make our code available on the server. This step consists of two parts: preparing authorization for Git and cloning Git repository. Since the preferred method is SSH cloning, it is reasonable to add the private key to the user’s home that gives the read access to application’s repository. Also, it is reasonable to keep all ansible-associated files in one repository but keeping a private key in repository is not safe, unless we encrypt it. Ansible comes with batteries included – there is an ansible-vault program that allows encrypting passwords, private keys, or any other data we want to keep in secret. It uses 256-bit AES encryption, which should be sufficient for most use cases. To encrypt the file, we have to type:
$ ansible-vault encrypt id_rsa_key
First you will be asked for a password. The password used with a vault must currently be the same for all files you wish to use together at the same time.
After preparation we can go back to our playbook and add:
  - name: Set the authorized key of a starting user
    authorized_key:
      user: "{{ app_user }}"
      state: present
      key: "{{ lookup('file', '~/.ssh/id_rsa.pub') }}"

  - name: Copy the encrypted SSH key
    copy:
      src: django_ssh_key
      dest: /home/{{ app_user }}/.ssh/id_rsa
      mode: 0600
    become: yes
    become_user: "{{ app_user }}"

  - name: Cloning app's repository
    git:
      repo: "ssh://gerrit.nokia.com:29418/NOKIA/BOOK/django"
      dest: "~/django-app"
      accept_hostkey: yes
    become: yes
    become_user: "{{ app_user }}"
On a side note, let’s take a closer look at the authorized_key/key entry – “lookup”. Lookups allow to access outside data sources. Like all templating, these plugins are evaluated on the Ansible control machine (the one running the playbook), and can include reading the filesystem, as well as contacting external datastores and services. This data is then made available using the standard templating system in Ansible.
2.3. Python and virtualenv
A clean environment in the host always helps to maintain the system. To keep Python pure, we should use python-virtualenv and install its packages. This step consists of two substeps: installing python34-virtualenv and installing the list of modules from requirements.txt.
  - name: Install python34-virtualenv
    yum:
      name: python34-virtualenv
    environment:
      http_proxy: "http://1.2.3.4:8080"
  - name: Install requirements
    pip:
      requirements: "~/django-app/requirements.txt"
      virtualenv: "~/venv"
      virtualenv_python: python3.4
      virtualenv_command: virtualenv-3
    become: yes
    become_user: "{{ app_user }}"
The most notable element is the environment section – the list of variables that should be set in an environment when executing a given task. Whenever I want to install something new in this playbook, I need to ensure that my office’s proxy server is set and I do it using the environment section. Since this element will be repeated, I prefer to put it at a “global” level of this play, below the “vars” section.
2.4. PostreSQL installation and configuration
While my application will configure the tables in database, it must have a ready database in the system. We can of course have one in Docker’s container, but we will do it in an Ansible-way. Last of the most useful Ansible modules is the “ansible-galaxy”. Ansible is written in Python and adopts a similar solution: the community can freely prepare and share their own configuration. In Ansible those shared configurations take form of “roles” - a package with playbooks and resources files that only takes some variables and can be used to set up our hosts. Similar to an “ansible-doc”, we can go browse roles’ definition on the website or use an ‘ansible-galaxy’ command:
$ ansible-galaxy search postresql
(…) # we choose one of the printed options
$ ansible-galaxy install -p ./ ANXS.postgresql
The role consists of structured directories and files. I use roles for my personal use but consider most of them as an overabundance. Roles are often written to support multiple systems and I have a rather unified environment in my work. In this case I cut out some of the role’s components or write my own, basing on the one from Ansible-galaxy.
$ tree ANXS.postgresql
ANXS.postgresql/ # role’s root directory and name of the role
├── ansible.cfg
├── defaults      # default values for the role – common among systems
│   └── main.yml
├── handlers
│   └── main.yml  # special tasks to be executed at the end of the play, for example service restarts
├── LICENSE
├── meta
│   └── main.yml # file with galaxy metadata, for example dependencies
├── README.md
├── tasks            # main part of the role – playbooks with tasks
│   ├── configure.yml
│   ├── databases.yml
│   ├── extensions
│   │   ├── contrib.yml
│   │   └── postgis.yml
│   ├── install_yum.yml
│   ├── main.yml   # main.yml is started by default when including the role
├── templates       # files in jinja2 that are populated with variables
│   ├── etc_apt_preferences.d_apt_postgresql_org_pub_repos_apt.pref.j2
│   ├── postgresql.conf-10.j2
│   ├── postgresql.conf-10.orig
│   └── … more
└── vars             # directory with variables – split per system
    ├── Debian.yml
    ├── empty.yml
    ├── RedHat.yml
    └── xenial.yml

11 directories, 57 files
When the role is downloaded, we should edit variables to meet our needs. We can pass variables to the role by setting them in our playbook or overwrite them in the role’s vars directory. Now we can add the role call to our playbook.
  - name: Run the role to install PostgreSQL
    include_role:
      name: "ANXS.postgresql"
2.5. Install and configure Gunicorn service
This step consists of two substeps: installing Gunicorn software and running it by specifying our application to be launched.
  - name: Install Gunicorn
    yum:
         name: python-gunicorn

    - name: Run Gunicorn
      gunicorn:
         app: wsgi
         chdir: "/home/{{ app_user }}/django-app"
         venv: "/home/{{ app_user }}/venv"
         user: "{{ app_user }}"
As we may see, the yum task does not have the environment part, since I have moved it to the top level, as a global value. Moreover, it might be better to merge iterative steps like yum, pip, or copy to one call, instead of calling them multiple times, since it improves a bit of the performance of the play, but for this tutorial I will keep it simple.
3. Play summary
ansible-playbook -i "10.157.53.63, " --private-key ~/.ssh/magic_key -u root django.yml

PLAY [all] ***************************************************************************************************************************************************

TASK [Gathering facts] ***************************************************************************************************************************************
ok: [10.157.53.63]

TASK [Creating a django user] **********************************************************************************************************************************
changed: [10.157.53.63]

TASK [Set an authorized key by starting the user] *******************************************************************************************************************
changed: [10.157.53.63]

TASK [Copy the encrypted SSH key] ********************************************************************************************************************************
changed: [10.157.53.63]

TASK [Cloning app's repository] ************************************************************************************************************************************
changed: [10.157.53.63]

TASK [Install python34-virtualenv] ***************************************************************************************************************************
changed: [10.157.53.63]

TASK [Install python34-virtualenv] ***************************************************************************************************************************
changed: [10.157.53.63]

TASK [Run the role to install PostgreSQL] ************************************************************************************************************************

TASK [ANXS.postgresql : include_vars] ************************************************************************************************************************
ok: [10.157.53.63] => (item=/home/szandala/nokia/ci/ansible/playbooks/ANXS.postgresql/vars/../vars/RedHat.yml)

TASK [ANXS.postgresql : PostgreSQL | Make sure the CA certificates are available] ****************************************************************************
skipping: [10.157.53.63]

(… very long output from the role, I will omit it …)

TASK [Install Gunicorn] **************************************************************************************************************************************
changed: [10.157.53.63]

TASK [Run Gunicorn] **************************************************************************************************************************************
changed: [10.157.53.63]

PLAY RECAP ***************************************************************************************************************************************************
10.157.53.63               : ok=8   changed=25   unreachable=0    failed=0
The summary output shows that 8 steps have the “ok” status, so nothing had to be done, and 25 have the “changed” status, so they were executed. There are also a few marked as skipped - coming from the role execution, they were omitted under certain conditions, for example they do not apply to this system. In a perfect configuration, we would have only “ok” tasks and in the worst case - “skipped”, which means that the configuration did not differ from the one we set at the beginning.
4. Summary
Ansible is a simple automation language that can perfectly describe an IT application infrastructure. It is easy to learn, it is self-documenting, and does not require a grad-level computer science degree to read. Automation should not be more complex than the tasks its replacing.
Do not forget about a very well-prepared Ansible Tower solution. It is the RedHat’s answer for GUI dashboards provided by Chef or Puppet. There is of course also an open-source version – AWX, that is without the company’s support. Apart from the easier running playbooks, it also provides a logging mechanism, an access control, and can mimic agent-architecture. We can just set a configured host to periodically ask the Ansible Tower if there are any configuration updates. But this and many more features of Tower/AWX is a topic for a separate article.
References
[1] http://docs.ansible.com/
[2] https://www.edureka.co/blog/chef-vs-puppet-vs-ansible-vs-saltstack/
[3] https://docs.ansible.com/ansible/2.4/vault.html
[4] http://docs.ansible.com/ansible/latest/reference_appendices/galaxy.html
[5] https://galaxy.ansible.com/
[6] Lorin Hochstein, Rene Moser, Ansible: Up and Running. Automating Configuration Management and Deployment the Easy Way
[7] Udemy course: Automation with Ansible based on Red Hat Training
[8] https://www.ansible.com/products/awx-project/faq
About the author
I am a PhD student at Wroclaw University of Science and Technology in the field of Artificial Intelligence. I am also a member of the Creation & Development Group KREDEK, which is a university science club. In NOKIA I work as a Software Configuration Engineer in Wroclaw’s DevOps Team. My daily work consists of deploying and maintaining hundreds of hosts for multiple purposes: Jenkins, Web Applications, compilation servers, and so on. My favorite task in life is solving problems since with computers impossible is nothing, it just takes a bit more time.