Bartosz KamińskiiOS Developer Daftcode
Carousel collection view layout
A step by step guide to creation of collection view layouts.
UICollectionView is one of the most powerful tools in the iOS world. It’s used in a multitude of apps, sometimes so highly customized that it’s hard to recognize original items and views. Whether you’re building a simple table or a complicated calendar app, a collection view is a way to go! In this article, I’d like to teach you about creating the collection view layouts. Together we’ll implement a horizontal layout with a custom scrolling - like this:
We can divide the development of this layout into three separate tasks:
- Allowing to focus on each item in a collection
- Making the items snap to a collection view’s center when scrolling ends
- Increasing spacing between the focused item and its neighbours
I’m going to walk you through these but first, let’s go briefly over the collection view’s core layout process.
Core layout process
The article assumes some knowledge of building custom layouts. If you’re unfamiliar with it, I highly recommend looking at Apple’s Collection View Programming Guide. It’s a great resource about a collection view in general, including creating the custom layouts.
In a nutshell, the collection view works with your custom layout object to manage the overall layout process by calling specific methods and properties. These allow you to calculate the position of items, and to provide the collection view with the information it needs. They are always called in the following order:
prepare(): perform the up-front calculations needed to provide layout information therecollectionViewContentSize: returns the overall size of the entire content area based on your initial calculationlayoutAttributesForElements(in rect: CGRect): returns the attributes for cells and views that are in the specified rectangle
After the layout process is finished, the attributes of your cells and views remain the same until you (or the collection view) invalidate the layout.
Implementation of basic layout functions
Prepare
We’ll start by implementing a prepare() method. It’s the place to perform the initial calculations needed to provide the layout attributes for all the items. For performance purposes, it’s a good idea to cache these in a dictionary. Our collection view has only one section, so all we have to do here is to iterate through all the items in that section, and save their attributes:
override open func prepare() {
    super.prepare()
    guard let collectionView = self.collectionView else { return }
    let itemsCount = collectionView.numberOfItems(inSection: 0)
    for item in 0..<itemsCount {
        let indexPath = IndexPath(item: item, section: 0)
        cachedItemsAttributes[indexPath] = createAttributesForItem(at: indexPath)
    }
}
Attributes are created in createAttributesForItem(at indexPath: IndexPath) function:
private func createAttributesForItem(at indexPath: IndexPath) -> UICollectionViewLayoutAttributes? {
  let attributes = UICollectionViewLayoutAttributes(forCellWith: indexPath)
  guard let collectionView = collectionView else { return nil }
  attributes.frame.size = itemSize
  attributes.frame.origin.y = (collectionView.bounds.height - itemSize.height) / 2
  attributes.frame.origin.x = CGFloat(indexPath.item) * (itemSize.width + spacing)
  return attributes
}
Its main purpose is the creation of attributes, but apart from that, it also sets their frame. It’s important that this function doesn't make any changes to attributes that depend on a collection view’s content offset. This way, we can keep our attributes cached while scrolling and only recreate them when the collection view’s bounds change or data source reloads. To purge attributes, just call removeAll() on the dictionary:
override func shouldInvalidateLayout(forBoundsChange newBounds: CGRect) -> Bool {
  if newBounds.size != collectionView?.bounds.size { cachedItemsAttributes.removeAll() }
  return true
}

override func invalidateLayout(with context: UICollectionViewLayoutInvalidationContext) {
  if context.invalidateDataSourceCounts { cachedItemsAttributes.removeAll() }
  super.invalidateLayout(with: context)
}
Next, add guard cachedItemsAttributes.isEmpty else { return } to your prepare() function, just above the for in loop. That way attributes will recreate if – and only if – you purged the cache.
Content size
Let’s move to the next must-override: collectionViewContentSizecomputed property. It returns the overall size of the entire content area based on the initial calculations performed in prepare(). That one’s easy! All we have to do is to find the leftmost and rightmost attributes in our cache:
override var collectionViewContentSize: CGSize {
  let leftmostEdge = cachedItemsAttributes.values.map { $0.frame.minX }.min() ?? 0
  let rightmostEdge = cachedItemsAttributes.values.map { $0.frame.maxX }.max() ?? 0
  return CGSize(width: rightmostEdge - leftmostEdge, height: itemSize.height)
}
Layout attributes
All that’s left for now are layoutAttributesForItem(at indexPath: IndexPath) and layoutAttributesForElements(in rect: CGRect)functions. Both rely on previously cached attributes. The first one simply returns attributes for a specified index path:
override func layoutAttributesForItem(at indexPath: IndexPath) -> UICollectionViewLayoutAttributes? {
  guard let attributes = cachedItemsAttributes[indexPath] else { fatalError("No attributes cached") }
  return attributes
}
while the second one checks out which attributes intersect with currently displayed rect and returns them:
override func layoutAttributesForElements(in rect: CGRect) -> [UICollectionViewLayoutAttributes]? {
  return cachedItemsAttributes
    .map { $0.value }
    .filter { $0.frame.intersects(rect) }
}
Perfect! We overrode all necessary functions and our basic layout is functional.
Layout's custom behaviour
Allowing to focus on each item
Finally, we can move on to our tasks! As a warm-up, let’s allow focusing on each item in a collection view. We can do this by adjusting the content inset:
private func updateInsets() {
  guard let collectionView = collectionView else { return }
  collectionView.contentInset.left = (collectionView.bounds.size.width - itemSize.width) / 2
  collectionView.contentInset.right = (collectionView.bounds.size.width - itemSize.width) / 2
}
Make sure to call that function in your prepare() implementation.
Making items snap to the center
Next, we’ll deal with snapping items to a collection view’s center. Overriding targetContentOffset allows you to analyze a proposed content offset (the point that scrolling would stop at if no adjustments were made) and return your own content offset:
override func targetContentOffset(forProposedContentOffset proposedContentOffset: CGPoint, withScrollingVelocity velocity: CGPoint) -> CGPoint {
  guard let collectionView = collectionView else { return super.targetContentOffset(forProposedContentOffset: proposedContentOffset) }
  let midX: CGFloat = collectionView.bounds.size.width / 2
  guard let closestAttribute = findClosestAttributes(toXPosition: proposedContentOffset.x + midX) else { return super.targetContentOffset(forProposedContentOffset: proposedContentOffset) }
  return CGPoint(x: closestAttribute.center.x - midX, y: proposedContentOffset.y)
}
We need a function that returns attributes, which are the closest to a specific horizontal position. We can implement it by looking at attributes, and finding the one which has the lowest distance between its center and the aforementioned position. layoutAttributesForElements(in rect: CGRect) is the way to go there. I’ve decided to pass a rect that’s twice as big as the collection view bounds - to make sure that even if user scrolls fast, the function will return correct attributes.
private func findClosestAttributes(toXPosition xPosition: CGFloat) -> UICollectionViewLayoutAttributes? {
  guard let collectionView = collectionView else { return nil }
  let searchRect = CGRect(
    x: xPosition - collectionView.bounds.width, y: collectionView.bounds.minY,
    width: collectionView.bounds.width * 2, height: collectionView.bounds.height
  )
  return layoutAttributesForElements(in: searchRect)?.min(by: { abs($0.center.x - xPosition) < abs($1.center.x - xPosition) })
}
The items should snap a to collection view’s center now. It’s a good idea to set collectionView.decelerationRate to UIScrollViewDecelerationRateFastin prepare() function. This makes scroll deceleration after user lifts their finger faster, and will result in more precise snapping.
Increasing spacing near the focused item
Finally, our last and most difficult task: increasing spacing between the focused item and its neighbours. Technically, what we are trying to accomplish here is shifting all the items preceding focused item to the left, and shifting all the items following it to the right. However, for it to be smooth, shift factor has to be a continuous function of the collection view’s content offset:
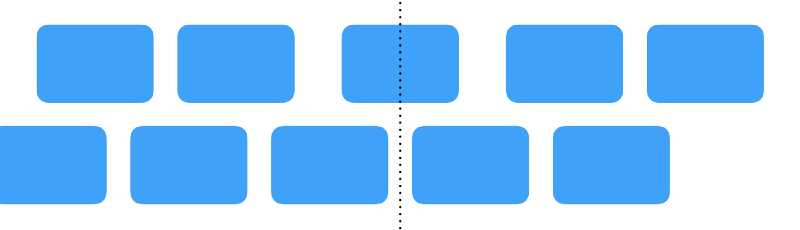
The dotted line illustrates the middle of a collection view
When an item is fully focused, a shift factor is the largest. But when the focus is between items, there’s no shift at all. Using content offset for this could be cumbersome, so I’ve decided to use something I called continuous focused index. It’s a computed property returning a fractional focused item’s index, like in this examples:
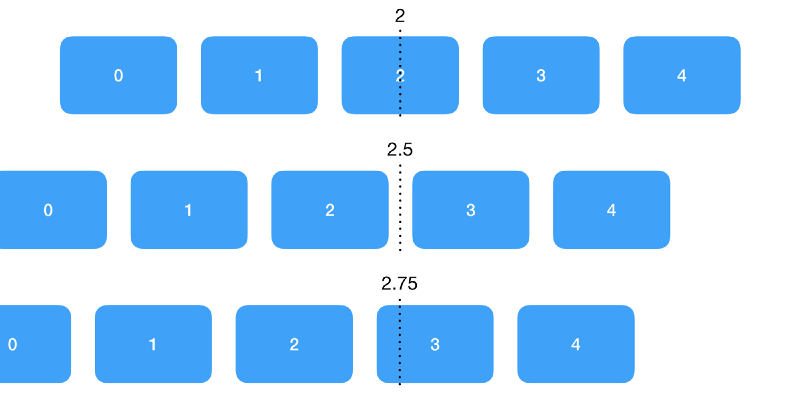
Continuous focused index for various content offsets (shift not yet applied)
Its implementation looks as follows:
private var continuousFocusedIndex: CGFloat {
guard let collectionView = collectionView else { return 0 }
let offset = collectionView.bounds.width / 2 + collectionView.contentOffset.x - itemSize.width / 2
return offset / (itemSize.width + spacing)
}
Now we can use it to implement attributes shifting. If you look at the examples, you can see that a maximum shift should occur when the continuous focused index is an integer, and a minimum - when it’s exactly +/– 0.5 from that integer. We’re going to use that in shiftedAttributes(from attributes: UICollectionViewLayoutAttributes)function.
private func shiftedAttributes(from attributes: UICollectionViewLayoutAttributes) -> UICollectionViewLayoutAttributes {
  guard let attributes = attributes.copy() as? UICollectionViewLayoutAttributes else { fatalError("Couldn't copy attributes") }
  let roundedFocusedIndex = round(continousFocusedIndex)
  guard attributes.indexPath.item != Int(roundedFocusedIndex) else { return attributes }
  let shiftArea = (roundedFocusedIndex - 0.5)...(roundedFocusedIndex + 0.5)
  let distanceToClosestIdentityPoint = min(abs(continousFocusedIndex - shiftArea.lowerBound), abs(continousFocusedIndex - shiftArea.upperBound))
  let normalizedShiftFactor = distanceToClosestIdentityPoint * 2
  let translation = (spacingWhenFocused - spacing) * normalizedShiftFactor
  let translationDirection: CGFloat = attributes.indexPath.item < Int(roundedFocusedIndex) ? -1 : 1
  attributes.transform = CGAffineTransform(translationX: translationDirection * translation, y: 0)
  return attributes
}
Let’s walk through this implementation. First, we need to find the closest integer focused index. That’s easy with round() function. We don’t want to do any shifting to the focused item, so we just return the original attributes on this one. Next, we calculate a shift area, which is a range spanning between two identity points (no shift there), and a maximum shift point in the middle. By finding the distance to the closest idle point and normalizing it to the 0…1 range, we get our shift factor! All we have to do now is to determine the direction of translation by checking if an item is before or after the focused one, and assigning a CGAffineTransform to attributes’ transform property. Don’t forget to update your layoutAttributesForItem(at indexPath: IndexPath) and layoutAttributesForElements(in rect: CGRect) function to return shifted attributes:
override func layoutAttributesForElements(in rect: CGRect) -> [UICollectionViewLayoutAttributes]? {
  return cachedItemsAttributes
    .map { $0.value }
    .filter { $0.frame.intersects(rect) }
    .map { self.shiftedAttributes(from: $0) }
}

override func layoutAttributesForItem(at indexPath: IndexPath) -> UICollectionViewLayoutAttributes? {
  guard let attributes = cachedItemsAttributes[indexPath] else { fatalError("No attributes cached") }
  return shiftedAttributes(from: attributes)
}
Congratulations! Your layout is fully functional now ?
I hope that it was helpful and now you know more about creating custom layouts. The completed project is available in my GitHub repository. In case you have any ideas on how to improve this layout, you’re welcome to contribute ?